
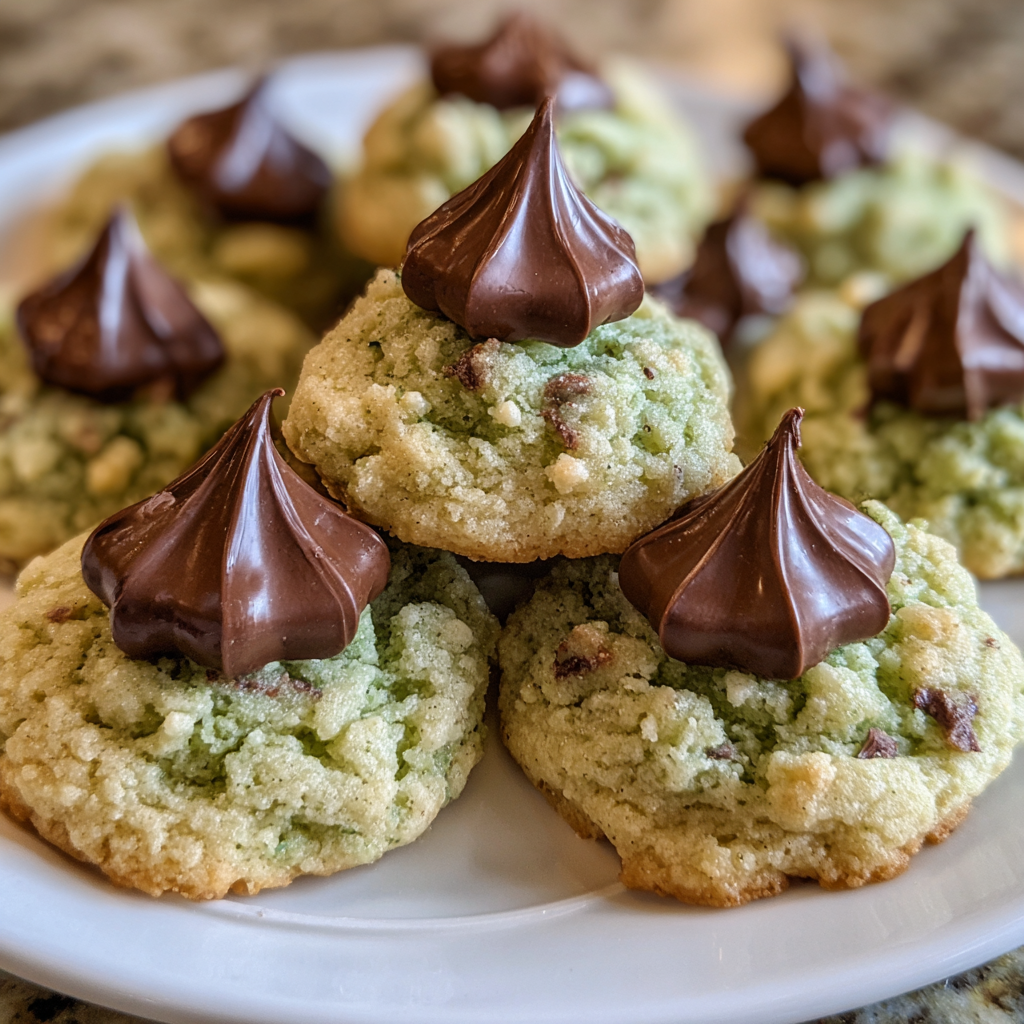
Mint Chocolate Kiss Blossom Cookies are a festive, bite-size treat that blend cool mint-infused dough with a rich chocolate kiss on top, delivering a delightful balance of sweet and refreshing flavors. The soft, slightly chewy texture and vibrant green color make these cookies perfect for holiday spreads, birthday celebrations, or any occasion that calls for a pop of color and indulgence. In this guide I share tips on choosing mint chocolate kisses, measuring ingredients, mastering bake time, and decorating each cookie for a professional look that will wow family and friends. Enjoy them today!!
Table of Contents
Why You’ll Love This Mint Chocolate Kiss Blossom Cookies
There is something inherently joyful about a cookie that looks as bright as a spring garden and tastes as cool as a winter breeze. The mint flavor in these cookies is subtle enough to please those who are not massive mint fans, yet distinct enough to give the dough a refreshing lift. Paired with a smooth chocolate kiss, the contrast of cool and sweet creates a sensory experience that feels both nostalgic and new.
Beyond flavor, the visual impact of a vibrant green cookie topped with a glossy chocolate kiss makes it an instant show‑stopper on any dessert platter. Whether you are arranging a holiday cookie tray, gifting a batch to friends, or simply indulging with a cup of tea, these cookies convey thoughtfulness and a touch of culinary confidence. The recipe is straightforward, requiring only basic pantry staples, so even beginners can achieve bakery‑level results without stress.
Equipment You’ll Need
Having the right tools simplifies the process and ensures consistent results. Here is a quick checklist of the essential equipment:
- Electric mixer or stand mixer for creaming butter and sugar
- Medium mixing bowls for dry and wet ingredients
- Measuring cups and spoons for precise quantities
- Rubber spatula for folding dry ingredients
- Baking sheets lined with parchment paper
- Cookie scoop or spoon for uniform dough balls
- Cooling rack for transferring baked cookies
While these items are common in most kitchens, investing in a sturdy silicone baking mat can also help prevent sticking and provide even heat distribution. If you lack a stand mixer, a hand‑whisk works fine; just give the butter and sugar a little extra time to become light and fluffy.
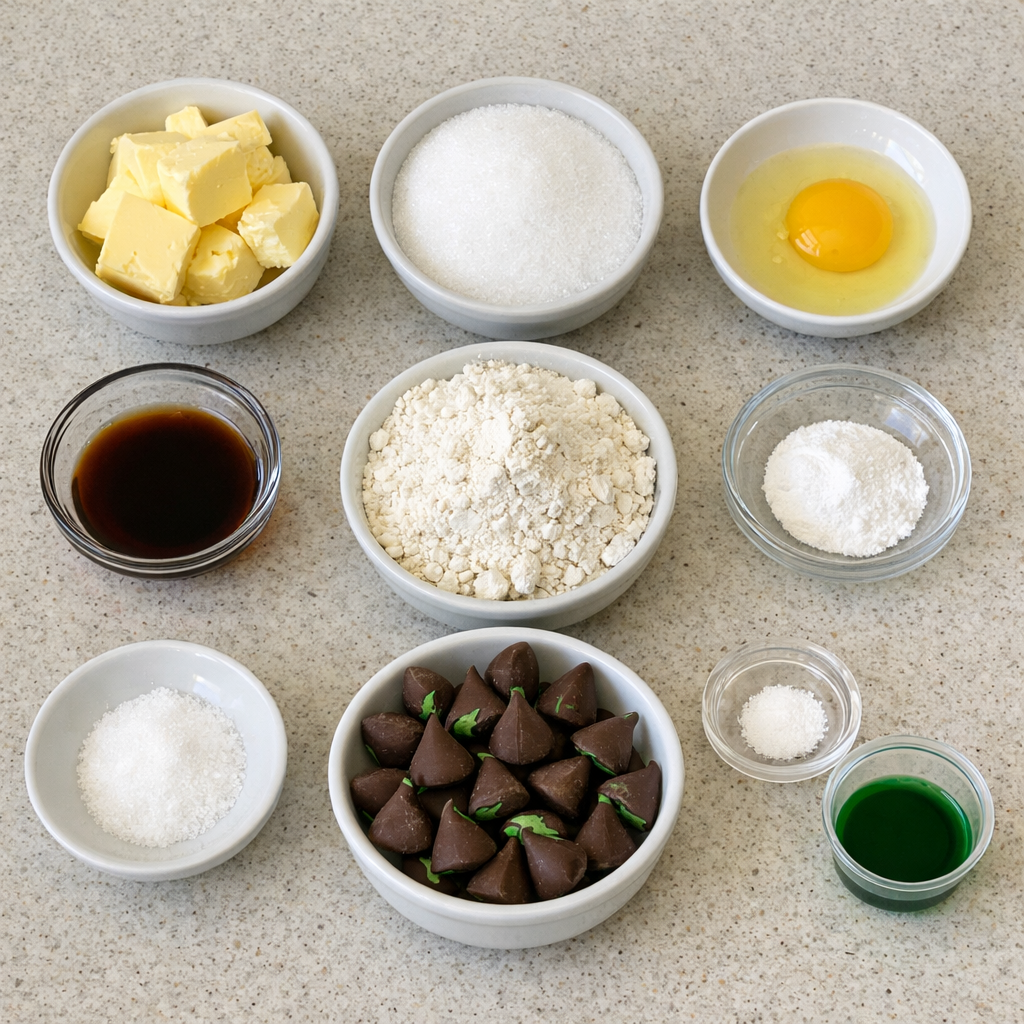
Ingredients for Mint Chocolate Kiss Blossom Cookies
The ingredient list is intentionally short, focusing on quality components that shine through in the final product. Using real butter, pure vanilla extract, and genuine mint‑infused chocolate kisses makes a noticeable difference in texture and flavor.
- 1 cup unsalted butter, softened
- 1 cup granulated sugar
- 1 large egg
- 2 teaspoons vanilla extract
- 2 cups all‑purpose flour
- ½ teaspoon baking soda
- ½ teaspoon salt
- 1 cup mint chocolate kisses, unwrapped
- Green food coloring (optional)
Ingredient Substitutions
If you need to adjust the recipe, consider these flexible swaps that keep the flavor profile intact. For a dairy‑free version, replace butter with a high‑quality plant‑based butter; the texture will stay tender. A pinch of almond extract can complement the vanilla for an extra aromatic note, but be careful not to overpower the mint. When fresh mint leaves are available, you can infuse a small amount of melted butter with chopped mint, strain, and then use the butter as called for, achieving a natural green hue without artificial coloring.
How to Make Mint Chocolate Kiss Blossom Cookies (Step‑by‑Step)
Step 1: Preheat the Oven
Set your oven to 350°F (175°C). A consistent temperature ensures the cookies spread evenly and develop a light golden edge while staying soft in the center. If you are using a convection setting, reduce the temperature by 25°F to prevent over‑browning.
Step 2: Cream Butter and Sugar
In a large mixing bowl, combine the softened butter and granulated sugar. Using an electric mixer on medium speed, beat the mixture for about 3‑4 minutes until it turns pale, fluffy, and noticeably lighter in texture. This aeration step creates the tender crumb you expect from a professional‑grade cookie.
Step 3: Add Egg and Vanilla
Crack the egg into the bowl, then drizzle the vanilla extract. Mix on low speed just until the egg is fully incorporated and the batter looks smooth. Over‑mixing at this stage can develop gluten, leading to a tougher cookie, so stop as soon as the mixture is uniform.
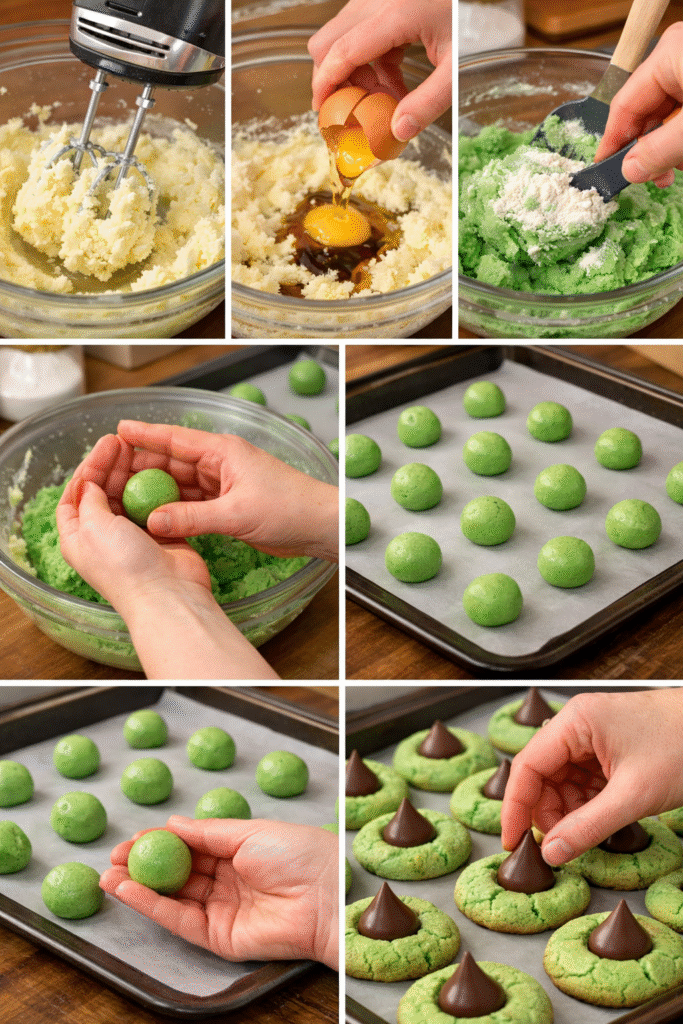
Step 4: Combine Dry Ingredients
In a separate bowl, whisk together the all‑purpose flour, baking soda, and salt. Whisking distributes the leavening agent evenly, preventing pockets of soda that could cause uneven rising.
Step 5: Incorporate Dry Ingredients
Gradually add the dry mixture to the wet mixture, using the mixer on low speed or folding with a spatula. Add the flour in two portions, allowing each addition to be fully absorbed before the next. The dough should come together into a soft, slightly sticky ball that holds its shape when scooped.
Step 6: Add Color (Optional)
If you desire a vivid green hue, add a few drops of green food coloring now. Stir gently until the color is evenly distributed; avoid over‑mixing, which could cause the dough to become tough.
Step 7: Portion the Dough
Using a cookie scoop (about 1‑tablespoon size) or a spoon, portion the dough into uniform balls. Place each ball on a parchment‑lined baking sheet, spacing them about 2 inches apart to allow for gentle spreading.
Step 8: Bake the Cookies
Slide the sheet into the preheated oven and bake for 10‑12 minutes. Watch the edges; they should turn a light golden brown while the centers remain soft. Remove the sheet when the cookies have just set but have not browned deeply.
Step 9: Add the Chocolate Kiss
While the cookies are still warm, press a mint chocolate kiss into the center of each one. The residual heat will gently melt the underside of the kiss, creating a seamless attachment without the need for additional glue.
Step 10: Cool and Serve
Allow the cookies to rest on the baking sheet for 2‑3 minutes, then transfer them to a cooling rack. This short cooling period lets the cookies firm up enough to handle without breaking while retaining a soft interior.
Variations and Twists
Once you master the classic version, you can experiment with several creative twists that keep the core concept intact while offering new flavor experiences.
- Chocolate‑Mint Swirl: Add a teaspoon of melted dark chocolate to the dough before mixing, creating a marbled effect.
- Nutty Crunch: Fold in a quarter cup of finely chopped toasted almonds for added texture.
- Spicy Mint: Incorporate a pinch of ground cayenne or a dash of chili powder for a subtle heat that accentuates the mint.
- White Chocolate Kiss: Substitute the mint chocolate kisses with white chocolate kisses flavored with peppermint extract for a sweeter profile.
Each variation maintains the cookie’s soft bite and striking appearance, allowing you to tailor the treat to seasonal themes or personal preferences.
What to Serve With Mint Chocolate Kiss Blossom Cookies
Pairing these cookies with complementary beverages and sides elevates the overall experience. A warm mug of herbal tea—such as chamomile or a lightly sweetened mint tea—mirrors the mint notes without competing. For those who enjoy a richer contrast, a glass of cold milk or a lightly sweetened vanilla latte provides a creamy counterpoint. You can also arrange a small cheese board featuring mild goat cheese or a light cream cheese spread, which adds a savory balance to the sweet mint‑chocolate combination.
Pro Tips for Perfect Results
- Use room‑temperature butter. Softened butter creams more easily, creating a lighter texture.
- Do not over‑mix after adding the flour; stop as soon as the dough comes together.
- Chill the dough for 15‑20 minutes if you find it too sticky to scoop; this prevents spreading.
- Press the chocolate kiss in while the cookie is still warm; the gentle melt secures it without cracking.
- Store cookies in an airtight container with a slice of bread to maintain moisture for up to a week.
Following these tips will help you consistently produce cookies that look polished and taste unforgettable.
Common Mistakes to Avoid
- Using melted butter instead of softened butter—this can lead to a greasy dough that spreads too much.
- Skipping the chilling step when the dough feels overly soft—cookies may flatten and lose their shape.
- Over‑baking—watch the edges closely; a few extra seconds can turn a soft cookie into a crisp one.
- Adding food coloring too early—this can cause the color to fade during baking; add it just before portioning.
- Pressing the chocolate kiss after the cookies have cooled completely—this can cause the kiss to crack or slide off.
Storage, Reheating & Make‑Ahead Tips
To keep the cookies fresh, store them in a sealed container at room temperature. Place a damp paper towel on top of the cookies before sealing; this adds a touch of humidity that prevents the edges from drying out. For longer storage, freeze the baked cookies in a single layer on a tray, then transfer them to a zip‑lock bag. When ready to serve, let them thaw at room temperature for 20 minutes, or warm them briefly in a 300°F oven for 5 minutes to revive their softness.
These cookies also travel well for potlucks or holiday parties. Pack them in a sturdy tin or a decorative box, and they will arrive intact and ready to impress.
Frequently Asked Questions
Can I use a different type of chocolate kiss? Yes, you can substitute with white chocolate or dark chocolate kisses, but keep in mind the flavor balance will shift.
Do I need to use food coloring? No, the coloring is optional. The dough will have a natural pale hue, and the green shade is purely decorative.
How long can I keep these cookies? Stored properly, they stay fresh for up to 7 days at room temperature, or up to 3 months in the freezer.
Can I make a gluten‑free version? Replace the all‑purpose flour with a 1‑to‑1 gluten‑free flour blend that contains xanthan gum for structure.
Conclusion
Mint Chocolate Kiss Blossom Cookies combine visual charm, refreshing flavor, and effortless preparation into a single irresistible package. By following the detailed steps, using quality ingredients, and applying a few pro tips, you can create a batch that dazzles both the eyes and the palate. Whether you’re celebrating a holiday, gifting a friend, or simply craving a mint‑chocolate treat, these cookies are sure to become a beloved staple in your baking repertoire.
Print
Mint Chocolate Kiss Blossom Cookies – Easy Holiday Mint Treat Recipe
- Total Time: 32 minutes
- Yield: 24 cookies 1x
- Diet: Vegetarian
Description
Mint Chocolate Kiss Blossom Cookies are a crowd‑pleasing holiday favorite featuring soft mint‑infused dough crowned with a decadent chocolate kiss. This easy, no‑frosting recipe yields 24 bite‑size treats that showcase a vibrant green hue and a refreshing mint flavor balanced by rich chocolate. Perfect for festive gatherings, gift‑giving, or a simple sweet snack, these cookies bake in just 12 minutes and stay tender for days, making them an essential addition to any seasonal bake‑off. Enjoy now!
Ingredients
- 1 cup unsalted butter, softened
- 1 cup granulated sugar
- 1 large egg
- 2 teaspoons vanilla extract
- 2 cups all-purpose flour
- ½ teaspoon baking soda
- ½ teaspoon salt
- 1 cup mint chocolate kisses, unwrapped
- Green food coloring (optional)
Instructions
- Preheat oven to 350°F (175°C) and line a baking sheet with parchment paper.
- Cream butter and sugar until light and fluffy.
- Beat in egg and vanilla extract.
- Whisk flour, baking soda, and salt together.
- Gradually add dry ingredients to wet mixture, mixing until combined.
- Add green food coloring if desired.
- Roll dough into balls and place on prepared sheet.
- Bake 10‑12 minutes until edges are lightly golden.
- Press a mint chocolate kiss into each warm cookie.
- Cool on sheet briefly, then transfer to a rack.
Notes
- For extra mint intensity
- add a few drops of peppermint extract to the dough. Chill dough for 15 minutes before shaping to prevent spreading. Store in an airtight container with a slice of bread to keep them soft.
- Prep Time: 20 minutes
- Cook Time: 12 minutes
- Category: Dessert
- Method: Baking
- Cuisine: American
Nutrition
- Serving Size: 1 cookie
- Calories: 120
- Sugar: 12g
- Sodium: 150mg
- Fat: 6g
- Saturated Fat: 3g
- Unsaturated Fat: 2g
- Trans Fat: 0g
- Carbohydrates: 15g
- Fiber: 0g
- Protein: 1g
- Cholesterol: 30mg
Keywords: Mint Chocolate Kiss Blossom Cookies, mint chocolate cookie recipe, holiday cookie ideas, easy mint cookies, chocolate kiss cookies, festive green cookies, mint chocolate dessert, quick holiday treats, cookie recipe easy, mint chocolate bake, green holiday cookies