
Cheesy Beef Biscuit Bombs are the perfect handheld snack that brings together fluffy biscuit dough, savory smoked beef, and melty cheese in a bite‑size explosion of flavor. Imagine pulling a golden‑brown bomb from the oven, the crust crackling as steam rises, and a rich, cheesy center stretching with each bite. This recipe delivers that restaurant‑style indulgence at home in under thirty minutes, using simple pantry staples and a ready‑made biscuit can. Whether you’re feeding a crowd at a game night, adding a fun appetizer to a potluck, or just craving a comforting treat, these bombs are quick to assemble, bake, and enjoy. Follow our step‑by‑step guide, discover handy equipment tips, and explore creative variations that keep this classic snack fresh and exciting every time you make it. Serve them hot with tangy ketchup or cool ranch dip, and watch guests reach for a bite of this savory delight.!!!
Table of Contents
Why You’ll Love This Cheesy Beef Biscuit Bombs
These bite‑size bombs combine the comforting familiarity of a biscuit with the satisfying heartiness of seasoned beef. The contrast between the crisp, buttery exterior and the gooey cheese‑filled interior makes each bite a mini celebration of texture and flavor. Because the dough is pre‑made, the preparation is fast, letting you focus on seasoning the beef just right. The result is a snack that feels indulgent yet is simple enough for a weekday treat or a weekend gathering.
Another reason fans fall for this recipe is its versatility. You can easily adjust the spice level, swap the cheese, or add extra herbs to match your personal palate. The small size also makes them perfect for buffet tables, game‑day spreads, or kid‑friendly snack stations. Plus, the aroma that fills the kitchen as they bake is an instant invitation for anyone nearby to gather around the oven.
Equipment You’ll Need
Having the right tools makes the process smoother and ensures consistent results. Below is a quick checklist of essential equipment:
- Large skillet or sauté pan – for browning the beef and mixing the seasonings.
- Mixing bowl – to combine the cooked beef with cheese and spices.
- Measuring spoons – for precise amounts of butter, garlic powder, and onion powder.
- Cookie sheet or baking pan – to place the assembled bombs for even baking.
- Pastry brush – optional, for brushing the tops with melted butter for extra shine.
All of these items are commonly found in a home kitchen, and you can find more detailed reviews at #.
Ingredients for Cheesy Beef Biscuit Bombs
Here is the full list of ingredients you’ll need to create these savory bites. Each component plays a specific role in flavor, texture, and overall satisfaction.
- 1 pound ground beef – provides a rich, meaty base.
- 1 cup shredded cheese (cheddar or mozzarella) – melts into a creamy interior.
- 1 can refrigerated biscuit dough – the convenient, fluffy wrapper.
- 1 tablespoon butter – adds richness to the cooking process.
- 1 teaspoon garlic powder – gives a subtle aromatic depth.
- 1 teaspoon onion powder – balances the garlic with sweet onion notes.
- Salt to taste – enhances all the flavors.

Ingredient Substitutions
If you need to tweak the recipe, consider these simple swaps that keep the flavor profile intact. Use smoked beef in place of ground beef for a deeper, smoky flavor. Swap cheddar for pepper jack if you enjoy a mild heat. For a dairy‑free version, replace the cheese with a plant‑based alternative, but keep the biscuit dough unchanged for the proper texture.
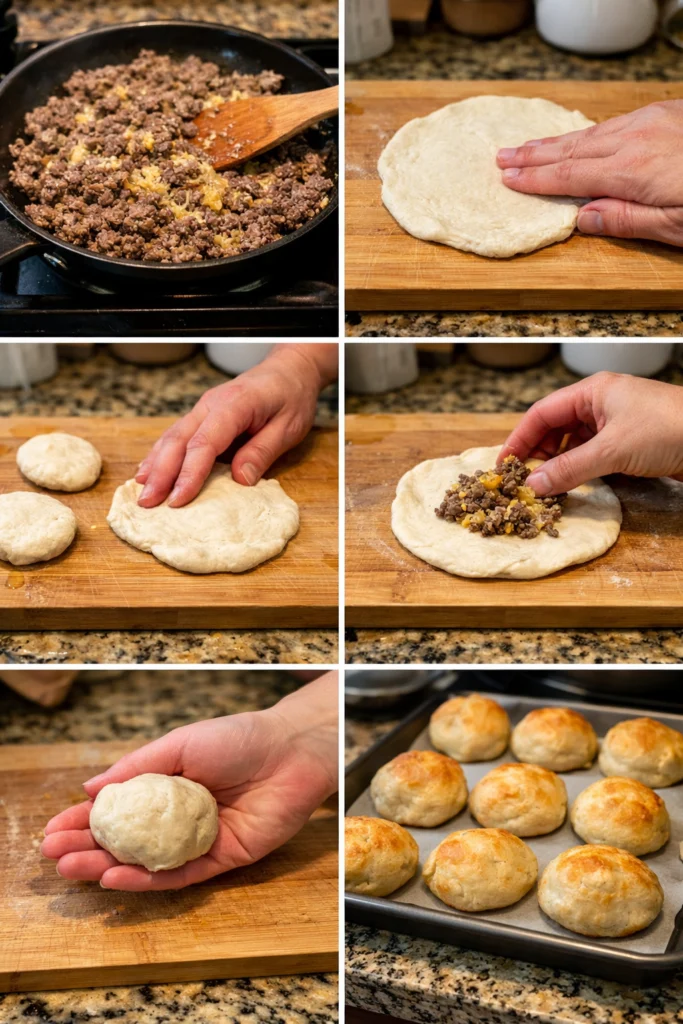
How to Make Cheesy Beef Biscuit Bombs (Step‑by‑Step)
Step 1: Preheat the Oven
Set your oven to 375°F (190°C). This temperature creates a golden crust while ensuring the interior reaches a safe temperature for the beef.
Step 2: Cook the Beef
Heat a skillet over medium heat and melt the butter. Add the ground beef, breaking it up with a spatula. Cook until the meat is fully browned, about 6‑8 minutes, and drain any excess fat if desired.
Step 3: Season the Meat
Stir in the garlic powder, onion powder, and a pinch of salt. Mix well so the seasonings coat the beef evenly. Remove the skillet from heat.
Step 4: Add the Cheese
While the beef is still warm, fold in the shredded cheese. The residual heat will begin to melt the cheese, creating a cohesive filling.
Step 5: Prepare the Biscuit Dough
Open the can of biscuit dough and separate each piece. Lightly flour a work surface and flatten each biscuit into a round disc about 4‑5 inches in diameter.
Step 6: Assemble the Bombs
Spoon a generous amount of the beef‑cheese mixture onto the center of each flattened biscuit. Fold the dough over the filling, pinching the edges to seal completely. Ensure there are no gaps where the filling could escape.
Step 7: Bake
Arrange the sealed bombs on a greased cookie sheet, leaving a small gap between each. Bake for 12‑15 minutes, or until the tops are golden brown and the biscuits have risen slightly.
Step 8: Cool and Serve
Allow the bombs to rest for a few minutes after removing them from the oven. This brief cooling period helps the filling set, making them easier to handle.
Variations and Twists
Once you master the classic version, feel free to experiment with these creative twists. Add a dash of smoked paprika to the beef for a subtle smoky heat. Incorporate finely chopped spinach or kale into the filling for extra nutrition without compromising flavor. For a spicy kick, mix in some diced beef pepperoni or a spoonful of beef chorizo. You can also try different cheeses—such as pepper jack or smoked gouda—to introduce new flavor dimensions.
What to Serve With Cheesy Beef Biscuit Bombs
These bombs are versatile enough to pair with a variety of sides and drinks. A crisp green salad with a light vinaigrette balances the richness of the snack. For a heartier option, serve alongside roasted vegetables like carrots, broccoli, or sweet potatoes. When it comes to beverages, a chilled glass of grape juice or a sparkling water with a splash of citrus complements the savory profile without overwhelming the palate.
Pro Tips for Perfect Results
- Use cold butter when melting it in the skillet; this prevents the beef from steaming rather than searing.
- Don’t overfill the biscuits—too much filling can cause leaks during baking.
- Brush the tops with a little melted butter before baking for a shiny, extra‑golden finish.
- Let the bombs rest for 3‑5 minutes after baking; this helps the cheese set and makes them easier to bite.
- If you’re making a larger batch, keep the uncooked assembled bombs refrigerated on a sheet pan, then bake them straight from the fridge, adding an extra minute to the bake time.

Common Mistakes to Avoid
- Skipping the pre‑heating step—an oven that isn’t hot enough will result in pale, soggy biscuits.
- Using too much butter in the skillet can make the beef greasy and interfere with browning.
- Leaving gaps in the seal—ensure the edges are pinched tightly so the filling stays inside.
- Over‑baking—watch the bombs closely; once they turn golden, they’re done. Over‑baking dries out the interior.
- Neglecting seasoning—taste the beef before adding cheese to adjust salt or add extra herbs if needed.
Storage, Reheating & Make‑Ahead Tips
These biscuit bombs store well for future meals. After cooling completely, place them in an airtight container and refrigerate for up to three days. To reheat, arrange them on a baking sheet and warm at 350°F (175°C) for 8‑10 minutes, or microwave for 30‑45 seconds if you’re in a hurry. For make‑ahead planning, assemble the bombs, place them on a tray, and freeze them uncovered for 2‑3 hours. Transfer the frozen bombs to a freezer bag; they keep for up to two months. When ready to bake, add a few extra minutes to the oven time.
Frequently Asked Questions
Can I use fresh biscuit dough instead of the canned version? Yes, fresh dough works well; just roll it out to the same thickness and follow the same assembly steps.
What cheese melts best for this recipe? Cheddar and mozzarella are both excellent; cheddar offers a sharper flavor while mozzarella provides extra stretch.
Is it possible to make these gluten‑free? Substitute the biscuit dough with a gluten‑free biscuit mix that follows similar rise and texture characteristics.
How do I keep the bombs from becoming soggy? Ensure the beef mixture is not overly wet and bake on a parchment‑lined sheet to promote even airflow.
Can I add vegetables to the filling? Absolutely—finely diced bell peppers, onions, or spinach blend nicely with the beef and cheese.

Conclusion
Cheesy Beef Biscuit Bombs deliver a satisfying crunch, melty cheese, and savory beef in a convenient, bite‑size package. With minimal prep, simple ingredients, and endless customization options, they’re an ideal addition to any snack repertoire. Give the recipe a try, experiment with your favorite twists, and enjoy the smiles they bring to every gathering.
Print
Cheesy Beef Biscuit Bombs: Easy 30‑Minute Party Appetizer Recipe
- Total Time: 25 minutes
- Yield: 8 servings 1x
- Diet: Standard
Description
Cheesy Beef Biscuit Bombs combine fluffy biscuit dough, seasoned ground beef, and melted cheese into bite‑size, golden‑brown treats that are perfect for parties, game nights, or a quick snack. Ready in under 30 minutes with pantry staples, these handheld delights deliver a comforting, cheesy flavor with a savory beef center, making them an irresistible crowd‑pleaser for any occasion. Serve them hot with tangy ketchup or cool ranch dip, and watch guests reach for a bite of this savory delight.!!!
Ingredients
- 1 pound ground beef
- 1 cup shredded cheese (cheddar or mozzarella)
- 1 can refrigerated biscuit dough
- 1 tablespoon butter
- 1 teaspoon garlic powder
- 1 teaspoon onion powder
- Salt to taste
Instructions
- Preheat oven to 375°F (190°C).
- Melt butter in a skillet over medium heat, add ground beef and cook until browned.
- Stir in garlic powder, onion powder, and salt; remove from heat.
- Mix in shredded cheese until melted.
- Open biscuit dough and separate pieces; flatten each into a circle.
- Place a spoonful of beef and cheese mixture in the center of each biscuit circle.
- Fold dough over filling and pinch edges to seal.
- Place bombs on a baking sheet and bake 12‑15 minutes until golden brown.
- Cool briefly before serving.
Notes
- For a smoky flavor
- use smoked beef instead of regular ground beef. Brushing the tops with melted butter before baking adds extra shine and flavor.
- Prep Time: 10 minutes
- Cook Time: 15 minutes
- Category: Snack
- Method: Baking
- Cuisine: American
Nutrition
- Serving Size: 1 bomb
- Calories: 250
- Sugar: 1g
- Sodium: 300mg
- Fat: 12g
- Saturated Fat: 5g
- Unsaturated Fat: 7g
- Trans Fat: 0g
- Carbohydrates: 22g
- Fiber: 1g
- Protein: 15g
- Cholesterol: 45mg
Keywords: Cheesy Beef Biscuit Bombs, easy party appetizers, bite size snacks, cheese stuffed biscuits, quick snack recipes, savory biscuit bites