
Classic Red Velvet Cake has been a centerpiece in my kitchen for years, and as a professional chef who also understands busy family life, I designed this recipe to be reliable, impressive, and practical. I want you to feel confident presenting a showstopper that stays moist, slices neatly, and looks luxe on the dessert table. This article blends a pro-tested velvet technique with time-saving tips and presentation ideas so you can bake a cake that delights at Valentines, birthdays, anniversaries, or any moment you want to celebrate. From my Cook by Co kitchen to your kitchen, this is dessert that travels well from “wow” to “wow, again.”
Table of Contents
what make this Recipe special
This Classic Red Velvet Cake has become a staple in my kitchen. I love how it balances ease with wow factor. On busy days, it proves reliable and impressive.
I can prep it with calm, not chaos. The crumb stays moist, and the red looks luxe. Anyone can slice cleanly and serve confidently.
From birthdays to anniversaries, it’s a celebration-ready centerpiece. I designed it for real kitchens, not perfect test labs. It travels well for potlucks and long weekends at grandma’s house.
And yes, it forgives my occasional shortcuts. By the time it rests on the plate, everyone asks for seconds.
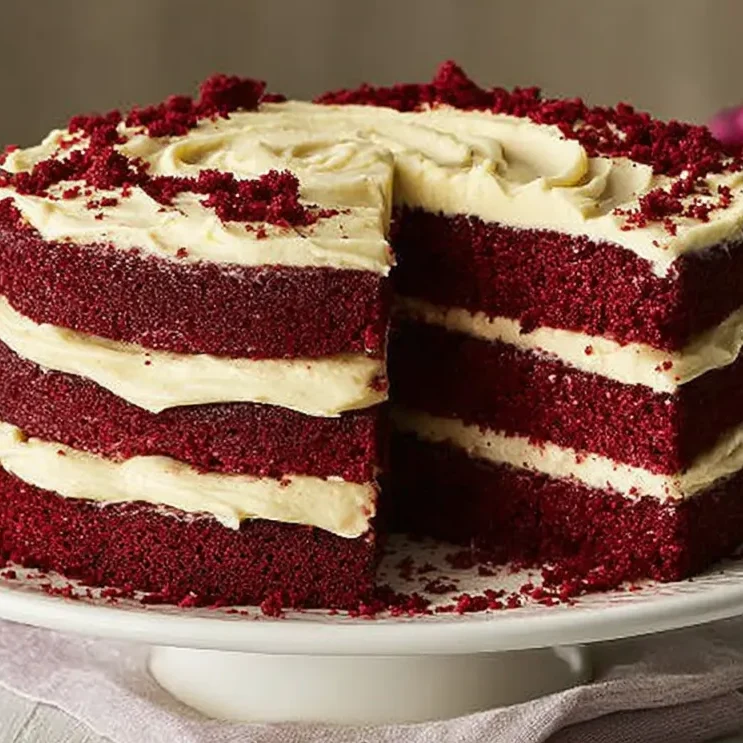
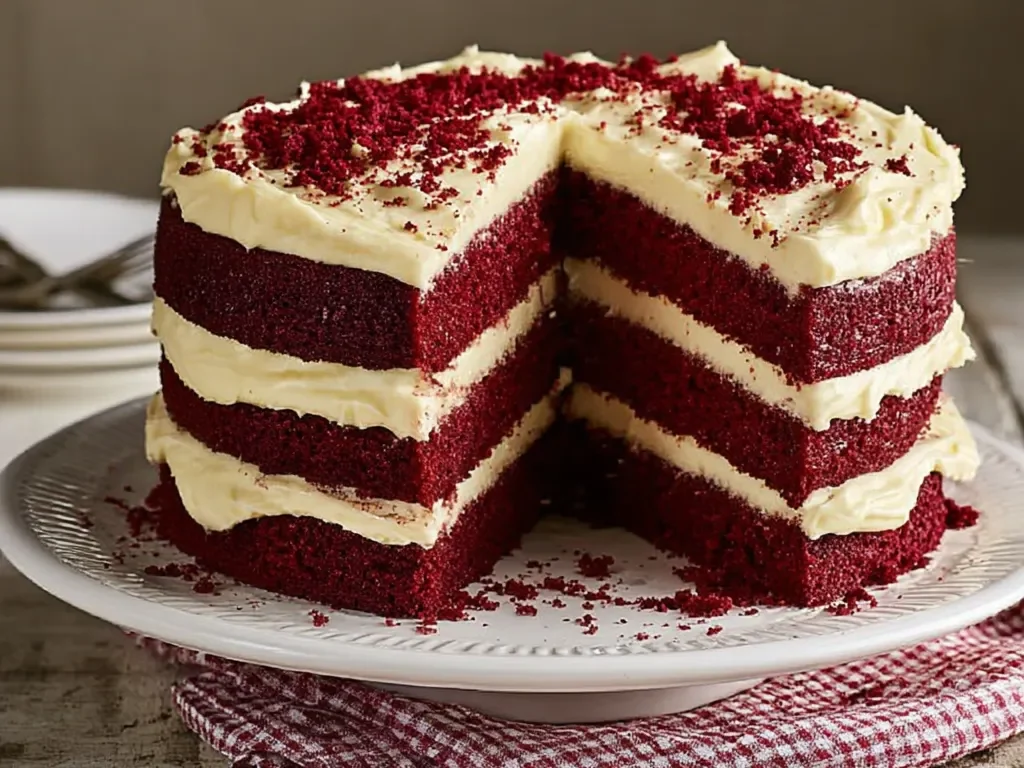
Classic Red Velvet Cake: why readers crave velvet
I notice readers crave velvet because it feels indulgent yet approachable. This Classic Red Velvet Cake offers a silky crumb, a dramatic red hue, and a frosting that’s tangy and creamy. It fits busy calendars—bake ahead, slice neatly, and serve with confidence at celebrations.
Velvet cake crave factors
- Velvet’s rich cocoa undertone with a brightness from vinegar
- Silky, tender crumb that stays moist for days
- Gorgeous red color that elevates any celebration
- Cream cheese frosting that adds tang and balance
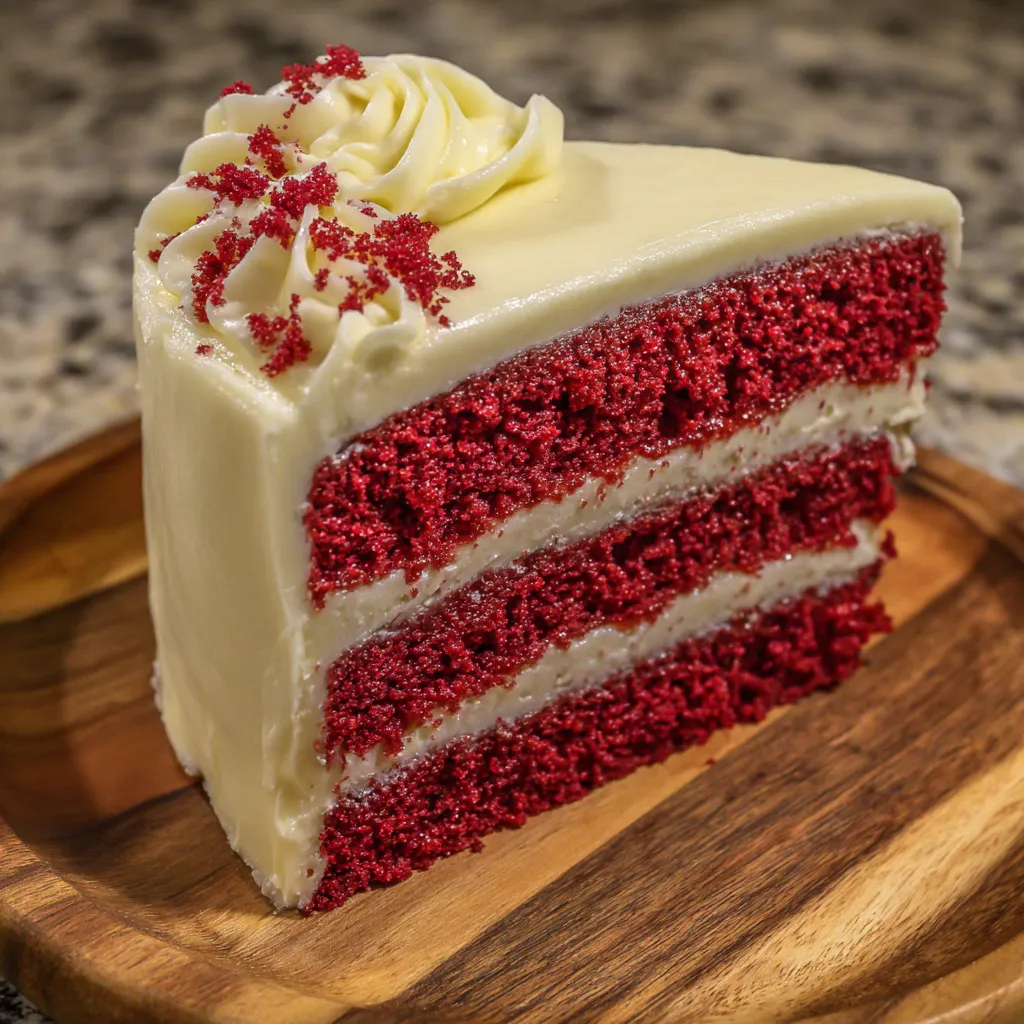
Velvet texture, color, and crowd-pleasing frosting
The texture is the heart of this cake. A soft, velvet crumb meets a tangy cream cheese frosting that fans out on every slice. The color is a luxe shade of red that photographs beautifully, making celebrations feel extra special.
Ingredients
I keep this ingredient list tight for Classic Red Velvet Cake. Each item matters for a moist, show-stopping velvet layer. I reach for simple pantry staples, then add a few pantry-friendly shortcuts if needed for a busy week.
Classic Red Velvet Cake ingredients at a glance
Dry ingredients form the cake’s backbone: flour, sugar, baking soda, cocoa, and salt. Wet ingredients bring moisture and color. Oil, buttermilk, eggs, red coloring, vanilla, and vinegar join. Frosting stars cream cheese, butter, sugar, and vanilla, delivering tang and creaminess. Optional rose petals or crumbs add a luxe finish.
Ingredient notes and substitutions
Not sure about buttermilk? Use milk with a splash of vinegar or lemon. Sour cream adds richness too, but it thickens slightly. Egg substitutes like flax eggs work in a pinch.
Dry ingredients focus
- 2 1/2 cups all-purpose flour
- 1 1/2 cups granulated sugar
- 1 tsp baking soda
- 1 tsp cocoa powder
- 1/2 tsp salt
Wet ingredients focus
- 1 1/2 cups vegetable oil
- 1 cup buttermilk, room temperature
- 2 large eggs, room temperature
- 2 tbsp red food coloring
- 1 tsp vanilla extract
- 1 tsp white vinegar
Print-friendly printing note for exact quantities
Exact quantities for the full recipe are printed at the bottom of the article, so you can print the card without hunting through the text.
How to Make Classic Red Velvet Cake
Step 1: Preheat and prepare pans
I preheat the oven to 350°F (175°C).
I grease two 9-inch pans and line with parchment rounds.
I lightly spray the sides for easy release.
Pans on a sheet tray stay level, no spills.
That extra step saves clean slicing later.
Step 2: Whisk dry ingredients
In a large bowl, I whisk flour, sugar, baking soda, cocoa, and salt.
Sift to aerate and break up lumps.
This keeps the velvet layers tender and ensures even color.
Set the dry mix aside until the wet ingredients are ready.
Step 3: Whisk wet ingredients
In another bowl, I whisk oil, buttermilk, eggs, red coloring, vanilla, and vinegar.
I keep room temperature ingredients handy for a smooth emulsification.
Mix until glossy and uniform, then stop.
If you use paste coloring, it deepens the red without thinning the batter.
Step 4: Combine and bake
I pour wet ingredients into the dry and mix just until combined.
I avoid overmixing to keep the crumb tender.
If there are small lumps, that’s fine.
I divide batter evenly between the pans.
Bake for 30–35 minutes until a toothpick comes out clean.
Cool in pans ten minutes, then transfer to a rack to cool completely.
Step 5: Cool and level
I cool the cakes in pans for 10 minutes.
Then I invert onto a rack and let them cool fully.
If domes form, I trim with a serrated knife for even layers.
Cooling completely helps frosting glide on smoothly.
Step 6: Cream cheese frosting prep and assembly
I beat cream cheese and butter until smooth and fluffy.
I add powdered sugar and vanilla, then whisk until spreadable.
If needed, I splash in a bit of milk to reach the right consistency.
Frost the bottom layer, stack the second, and finish with a light crumb coat.
Chill briefly to set the frosting for neat slices.
Tips for Success
Moisture and crumb control for Classic Red Velvet Cake
In my kitchen, I keep ingredients at room temperature for the Classic Red Velvet Cake and mix just until combined. I avoid overmixing to keep the crumb tender, using buttermilk for moisture and a gentle fold to preserve air.
Color and flavor tuning tips
For a vivid red in this Classic Red Velvet Cake, I use a combo of paste and liquid coloring. I balance the cocoa so the flavor stays rich, not bitter, and add a splash of white vinegar to brighten color and tang.
Equipment Needed
Must-have tools for this cake
I rely on two 9-inch round pans, parchment rounds, a handheld or stand mixer, a silicone spatula, a whisk, and a cooling rack for even, simple layers.
Substitutes and alternatives
If you’re missing a mixer, whisk by hand; parchment can replace sprayed liners; and you can use round pans instead of specialty shapes.
Variations
Dairy-free and gluten-appropriate options for Classic Red Velvet Cake
Dairy-free and gluten-appropriate options for Classic Red Velvet Cake: Swap in a dairy-free cream cheese frosting and a gluten-free 1:1 flour mix. Use dairy-free cream cheese and plant-based butter with powdered sugar and vanilla for the frosting. For the cake, choose a gluten-free all-purpose blend that includes xanthan gum; if yours doesn’t, stir in 1/4 teaspoon xanthan gum per cup of flour. Use a dairy-free buttermilk substitute (almond, soy, or oat milk plus a teaspoon of vinegar) to keep the crumb moist.
Flavor twists and accent ideas
Flavor twists and accent ideas: Try a shot of espresso in the batter for a mocha-red velvet, or fold in melted chocolate to deepen cocoa. A hint of orange zest brightens the frosting. For a playful finish, sprinkle orange zest or cocoa powder, or swap vanilla for almond extract.
Why You’ll Love This Classic Red Velvet Cake
I reach for this Classic Red Velvet Cake when I want wow fast. It stays moist, slices neatly, and looks luxe. That combo makes celebrations easy for busy moms and pros alike. A few smart shortcuts keep prep calm and results pro-quality. Readers tell me it tastes bakery-fine yet feels homey. The vibrant color photographs beautifully on the dessert table too. Let’s keep it within an hour from pantry to plate. Trust me, this Classic Red Velvet Cake earns smiles every time.
Easy, reliable show-stopper for celebrations
I love how dependable this cake is for gatherings. The layers bake evenly, slice cleanly, and the frosting glides on smoothly. It looks luxe on the dessert table with minimal fuss.
Time-saving tips that fit a busy schedule
I often bake layers a day ahead and refrigerate them. Frosting can be made earlier and kept chilled for easy assembly. Or, for a rush, use store-bought frosting and fold in vanilla.
Serving Suggestions
I love serving Classic Red Velvet Cake with simple accompaniments that elevate its elegance. A dollop of whipped cream, berries, or a sparkling drink makes every slice festive. On busy days I plate with a clean edge and a tiny garnish for photo-worthy moments. These small touches matter to me.
- Whipped cream with fresh berries and a light dusting of cocoa complements Classic Red Velvet Cake.
- A small scoop of vanilla ice cream for a party vibe.
- Pair with coffee or tea for Classic Red Velvet Cake.
- Serve with a few rose petals for a romantic touch.
- Keep slices chilled for clean cuts on the dessert table.
Plating and presentation ideas for Classic Red Velvet Cake
Plate each slice on a clean, chilled plate. Wipe the knife between cuts for neat edges, then add a tiny cream-cheese dab and a rose petal or crumb sprinkle.
Pairings and accompaniments
Pair with coffee or tea for a balanced finish, or serve with sparkling water or a light dessert wine to elevate celebrations.
Make-Ahead and Storage for Classic Red Velvet Cake
Make-ahead assembly and storage
For busy weeks, bake the cake layers a day ahead. Cool completely, then wrap tightly in plastic and freeze flat. Frosting can be made ahead and kept refrigerated for up to 3 days. Assemble when ready, and refrigerate briefly to set.
Freezing and thawing tips
To freeze the whole cake, wrap it airtight and freeze up to two months. Thaw in the refrigerator overnight, then bring to room temperature before slicing. For slices, freeze wrapped individually for grab-and-go portions. Frosting can be added after thawing, or a light coat kept ready.
FAQs
Classic Red Velvet Cake FAQs
Classic Red Velvet Cake is forgiving and adaptable in my kitchen. If you’re out of buttermilk, use milk with a splash of vinegar. For dairy-free frosting, swap in dairy-free cream cheese and plant-based butter. Use a gluten-free 1:1 blend with a pinch of xanthan gum if you need gluten-free velvet. For eggs, you can make a flax or chia egg, but results vary slightly. To keep the crumb moist, avoid overmixing and use room-temperature ingredients. The color and tang from vinegar, cocoa, and color paste help this velvet stay vibrant.
Can I make this ahead or freeze it?
Yes. You can bake the layers a day ahead and refrigerate, or freeze cooled layers for longer storage. Frosting can be made ahead and kept chilled. Whole cake freezes well for up to two months; thaw overnight in the fridge.
Final thoughts
Cooking this Classic Red Velvet Cake reminds me why I bake, turning busy days into small celebrations and shared smiles across the kitchen each time.
When I lift the platter and see the light catching the rose hues, gratitude for simple joy rushes through me in every celebrated bite tonight.
This cake trains my patience and confidence; bake ahead, stack neatly, and still serve warmth that feels bakery-polished yet homey to friends and family alike.
I’d love to see your results, share photos of your Classic Red Velvet Cake triumphs, big or small, and keep kitchen conversations thriving with me.
Print
Classic Red Velvet Cake: 7 Tips for Moist, Irresistible Velvet Layers.
- Total Time: 1 hour 25 minutes
- Yield: Serves 10–12 1x
- Diet: Vegetarian
Description
Classic Red Velvet Cake is a timeless showstopper featuring deeply cocoa-flavored velvet layers, a soft, velvety crumb, and a luxurious cream cheese frosting. This celebration-ready dessert stays moist and tender, with a dramatic red hue and elegant finish. Perfect for Valentine’s Day, anniversaries, birthdays, or any special occasion, it shines with beauty and irresistible flavor from slice to slice. A few simple steps yield even layers and a pro-looking finish.
Ingredients
- 2 ½ cups all-purpose flour
- 1 ½ cups granulated sugar
- 1 tsp baking soda
- 1 tsp cocoa powder
- ½ tsp salt
- 1 ½ cups vegetable oil
- 1 cup buttermilk, room temperature
- 2 large eggs, room temperature
- 2 tbsp red food coloring
- 1 tsp vanilla extract
- 1 tsp white vinegar
- 16 oz cream cheese, softened
- ¾ cup unsalted butter, softened
- 4 cups powdered sugar
- 2 tsp vanilla extract
- Optional garnish: sugar-frosted rose petals or red velvet cake crumbs
Instructions
- Preheat oven to 350°F (175°C). Grease and line two 9-inch round cake pans.
- In a large bowl, whisk flour, sugar, baking soda, cocoa powder, and salt.
- In another bowl, mix oil, buttermilk, eggs, food coloring, vanilla, and vinegar until smooth.
- Gradually add wet ingredients to dry ingredients and mix until just combined.
- Divide batter evenly between prepared pans.
- Bake for 30–35 minutes, or until a toothpick inserted comes out clean.
- Cool cakes in pans for 10 minutes, then transfer to a wire rack to cool completely.
- Beat cream cheese and butter until smooth. Gradually add powdered sugar and vanilla until fluffy.
- Frost the cooled cake layers and decorate with rose petals or crumbs if desired.
- Slice and serve for a stunning, classic dessert.
Notes
- Let all refrigerated ingredients come to room temperature before whisking for a smoother batter.
- Avoid overmixing after adding wet to dry to keep the crumb tender.
- For an extra vibrant red, you can increase the red coloring slightly, or use a combination of paste and liquid food coloring.
- Chill the frosted cake slightly to help with clean slicing, if desired.
- Store leftovers in the refrigerator for up to 3–4 days or freeze slices for longer storage.
- Prep Time: 25 minutes
- Cook Time: 35 minutes
- Category: Dessert
- Method: Baking
- Cuisine: American
Nutrition
- Serving Size: 1 slice (about 1/10 of cake)
- Calories: Approximately 400 calories per slice
- Sugar: Approximately 28 g
- Sodium: Approximately 240 mg
- Fat: Approximately 22 g
- Saturated Fat: Approximately 12 g
- Unsaturated Fat: Approximately 6 g
- Trans Fat: 0 g
- Carbohydrates: Approximately 52 g
- Fiber: Approximately 1 g
- Protein: Approximately 6 g
- Cholesterol: Approximately 60 mg
Keywords: Classic Red Velvet Cake, moist red velvet cake, cream cheese frosting, velvet layer cake, red velvet dessert, celebration cake, Valentine’s Day cake, best red velvet recipe, cake recipe